Upload Your Music and Content
When it comes to uploading files to websites or services, FTP is the best way to go.
Although a lot of place will allow files to be uploaded via some web page, I still strongly recommend FTP.
One beneift using a webpage to upload can be that several functions might be performed to add this file to a library and reference it internally (wordpress grapics for example.)
Here are my reason for ignoring that and only focussing on FTP.
- No file size limitation. FTP can up load larger files.
- No timeouts. Http uploads miht time out and then you need to start again.
- Resume file upload if connection is list. Even if you lose your internet, when you reconnect FTP can carry on from where it last got to. Even mid file.
- When used properly, you can ensure files are exactly the same bit for bit. HTTP is notriously unreliabe and often corrupts files.
- Built in queue management. You can start a large job and just leave it running. Wlk away and do more interesting stuff.
- Very easy to make back ups.
There are other reasons, but this should answer why I use FTP for any big updates I am doing.
FTP Software
There are lots of programs out there capable of handling FTP connections and transfers. If you do not already have one, my recommendation is FileZilla. Mainly because it is free.
You can download filezilla currently from here: https://filezilla-project.org/download.php?show_all=1
Information Required to Connect to TorontoCast
In order to connect to the correct place to upload your music you will need three pieces of information that you can get from your Centova control panel.
Default Account
At the top of the navigation panel in centova, click on Quick Links.
At the bottom of this page you will see a section called FTP Client Connections. Under here is the first 2 pieces of information:
FTP Hostname: [Either an IP or a servername] FTP Username: [your username] FTP Password: (Your administrator password)
Your administrator password can be found in Settings.
Next to Administrator Password is a series of dots. Your password is hidden by default. Click on the icon next to this box to see your password magically appear. You can select and copy it from here.
Note: The username and password are handy to keep a copy of somewhere safe. It can come in handy should the centova webpage become inaccessable.
DJ Accounts
In Centova you can also give FTP access to your server to your DJ’s. You need to configure what level of access you want to give to each DJ account.
In Centova click on DJs under Configuration in the navigation menu.
If you have a DJ account set up, click on the edit account cog next to the DJ account you wish to give FTP access to.
If you dont have a DJ account, click on Create DJ Account
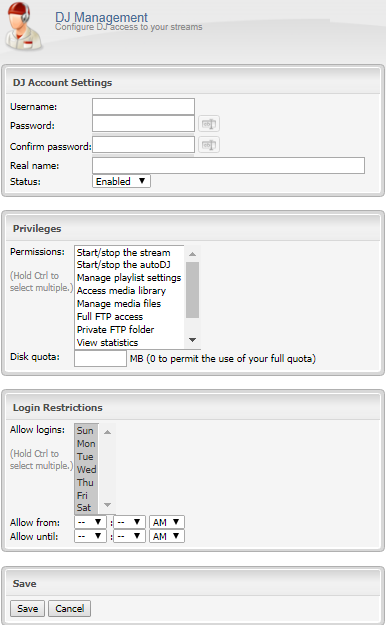 Account Settings
Add the user name for your DJ here. This will be used to name their upload folder is you give them a private folder. They will also use it for logging into Centova and FTP.
Set and confirm the password for this account.
Put the users real name in here so you can keep track of who is using what account.
Keep it set to Enabled if you wish this acount to be used for FTP uploads and/or going live.
Privileges
Click on the settings you wish to assign to this account. It will highlight blue when selected. Press and hold CTRL to select and deselect multiple choices.
If you give this account Full FTP access it will act the same as the above default account.
If you give this account Private FTP folder a folder will be created in youe media folder called DJ and in here another folder named after the DJ username. This account will only be able to upload files into this folder.
If you are giving access to several people to upload files, you should also set a limit in Disk quote to prevent one user filling up your entire allowance.
Login Restrictions
The next part you set a schedule for when this account is active. Prevents access out side of these times. More usefull for live shows.
When finished click on Save.
Below is the default Filezilla Layout
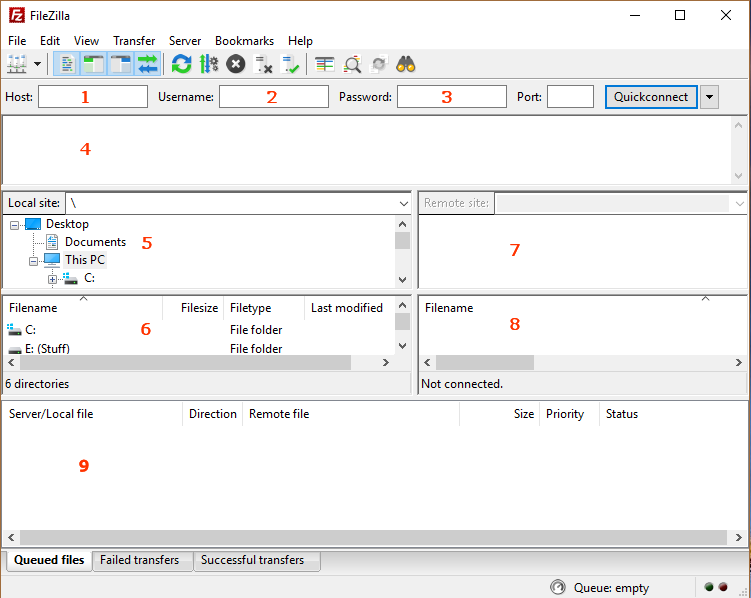
1: Type your hostname in here. – (Either an IP or something similiar to agnes.torontocast.com)
2: Type your username in here.
3: Type your password in here.
Once filled out all three boxes, click on Quickconnect. In future, you can use teh drop down arrow next to Quickconnect to quickly reconnect.
If you use it a lot you can then click on File> Copy current connection to site manager…
Ignore the port. This will be automatically filled in when you connect.
4: The area is where the program will give you messages. It will tell you if there is an error with the username/password, and other errors to help troubleshoot should you run into difficulties.
5: This is the folders on your own PC.
6: This is the files in the folder you select above.
7: This will be the list of folders on the server you connect to.
8: Again, this will be the list of files in the folder selected above.
9: This panel will show all the activity of files uploading or downloading.
Below it are three tabs that allow you to find any files that failed to try again.
Upload those tracks
With your FTP program now connected you should be presented with three folder in panel 7 above : media, ondemand and sounds. We are only concerned with media. Do not worry about any questionmarks. This just means you have not opened that folder in the current sesion yet so it does not know what is inside.
Click on media. It should highlight light grey, and the window directly below (8) will show its current contents.
Note: I have never liked uploading music directly to this folder. It can get really messy fast. It can also cause problems in other places, so please work tidy!
- Firstly lets create a folder for the bulk of our music. Right Click in the blank area of panel 8. Select Create Directory and enter it. I am going to call it General Music. You can call it anything you want. It is best to give it a name that makes it easy to find when selecting tracks for your playlists. When you finish typing the name and press enter or click ok you will automatically be taken into the folder.
- OPTION 1. find the files you want to upload on your PC and simpy drag them over panel 8 to start them uploading.
- OPTION 2. Using the options in Panels 5 & 6, navigate to the folder containing the files you want to upload. Select all the files you wish, right click and select upload.
- Once you have done this panel 9 will show you all the files in progress. Once the queue is empty you should see a number in teh tab Successful Transfers. If it matches everything is ok.
If you see any number next to Failed transfers, click on this tab. This will show any files that did not complete. It might be you reached the quota. Right clicking on them here will give you the option to Reset and requeue the files to try again.
!! The file size in panel 8 should be identical to the file size shown in panel 6 of the same file. With FTP if you close the FTP program early, partial uploads can exist. These will look normal as FTP does nothing special when creating a file to show it is in the process of being uploaded. If you find this, simply try uploading again – if it is a large file and you only got partially uploaded, FTP can resume and finish the upload for you.
Centova will monitor the FTP activity to update the media library. Sometimes though this can fail. If you are unable to find files in Centova you know you have uploaded you might need to reindex.
- Under AutoDJ in teh Centova control panel click on Media.
- At the top right of this window click on Options and select Manual Library Update.
- Let the process compete.
- If you still can not find the files, please make sure you have uploaded files in the correct format. Flac forexample will not be recognised.